
Cowboy hats are not just a staple of Western wear but a canvas for creativity and self-expression. Whether you’re gearing up for a rodeo, a country-themed party, or just want to showcase your unique style, decorating a cowboy hat can be a fun and rewarding project.
This article explores various DIY cowboy hat decoration ideas, complete with instructions, tips, and inspiration to get you started.
Introduction
The cowboy hat is an iconic symbol of the American West, embodying ruggedness and adventure. However, it also offers an exciting opportunity for personal expression through decoration.
Whether you prefer a classic look or something more vibrant and unique, decorating your cowboy hat can enhance your outfit and showcase your personality. From adding colorful beads to intricate floral designs, the possibilities are endless.
Materials Needed
Before diving into the decoration ideas, gather the necessary materials. While specific items will depend on your chosen decoration style, here are some standard supplies you might need:
- Cowboy hat (straw or felt)
- Hot glue gun and glue sticks
- Ribbons and fabrics
- Beads and sequins
- Paints (fabric paint or acrylic)
- Brushes (various sizes)
- Feathers (natural or synthetic)
- Floral wire and faux flowers
- Embroidered patches or appliqués
- Scissors
- Craft knife
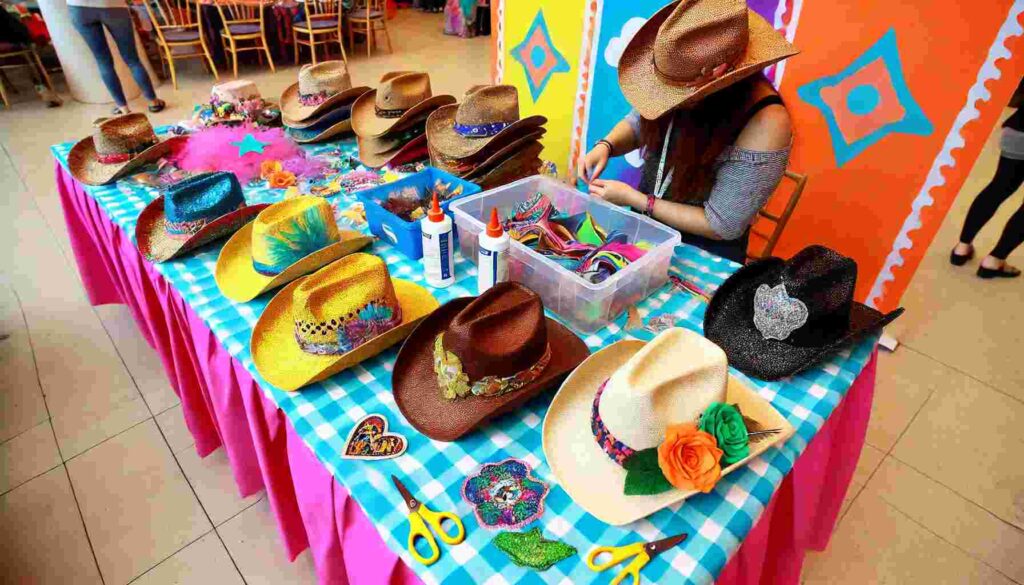
Decoration Ideas
Beaded Band
Materials Needed:
- Beads (various colors and sizes)
- String or elastic cord
- Scissors
- Needle (optional)
Instructions:
- Measure the circumference of your cowboy hat where you want to place the beaded band.
- Cut a string or elastic cord that matches this measurement, leaving a few extra inches for tying.
- Start threading beads onto the cord, creating your desired pattern.
- Once finished, tie the ends securely and attach the band to the hat using hot glue for added stability.
Tips: Mix different types of beads (glass, wooden, or plastic) for a more dynamic look.
Floral Arrangement
Materials Needed:
- Faux flowers (in various sizes)
- Floral wire
- Hot glue gun
- Scissors
Instructions:
- Select a variety of faux flowers that complement your hat’s color.
- Trim the stems of the flowers to about 2 inches in length.
- Arrange the flowers on one side of the hat to create an eye-catching focal point.
- Use floral wire to secure the flowers to the hat, or use hot glue for a stronger hold.
Tips: Consider adding greenery for depth and texture. You can also mix in some wildflowers for a more rustic vibe.
Painted Designs
Materials Needed:
- Fabric paint or acrylic paint
- Paintbrushes
- Stencils (optional)
- Water for cleaning brushes
Instructions:
- Decide on a design (such as stars, cacti, or abstract patterns) to paint on your hat.
- If using stencils, place them where you want to paint.
- Using your paintbrush, carefully apply the paint. Allow it to dry thoroughly before handling.
- Consider applying a clear fabric sealer over your painted design for extra protection.
Tips: First, test the paint on a small, inconspicuous area to ensure it adheres well and looks good.
Ribbon Wrap
Materials Needed:
- Ribbons (various colors and textures)
- Hot glue gun
- Scissors
Instructions:
- Choose a selection of ribbons that complement your hat’s color.
- Start at the base of the hat and apply a thin line of hot glue.
- Lay the ribbon over the glue and wrap it around the hat, applying glue as needed to secure it.
- Cut the ribbon at the end and secure it with more glue.
Tips: Mixing different ribbon widths and textures can add visual interest.
Feather Accents
Materials Needed:
- Feathers (various colors)
- Hot glue gun
- Scissors
Instructions:
- Select a few feathers that match your style.
- Apply a small amount of hot glue to the base of each feather.
- Press the feathers onto the desired location on your cowboy hat.
- Allow the glue to set before wearing.
Tips: Opt for long, colorful feathers for a bold look or small, subtle feathers for a more understated approach.
Personal Photos
Materials Needed:
- Small photos printed on fabric or paper
- Mod Podge or fabric glue
- Scissors
- Clear acrylic spray (optional)
Instructions:
- Print out small photos that mean something to you. These could be personal memories or inspiring images.
- Apply a thin layer of Mod Podge or fabric glue to the back of the photo.
- Carefully position the photo on your hat and press down firmly.
- Once dry, consider applying a layer of clear acrylic spray for durability.
Tips: Using fabric-based prints can help them adhere better and withstand wear.
Embroidered Patches
Materials Needed:
- Embroidered patches
- Needle and thread (or hot glue)
- Scissors
Instructions:
- Choose patches that reflect your personality or interests.
- Decide where you want to place the patches on your hat.
- Sew or glue the patches onto the hat securely.
Tips: Layering patches can create a unique, textured look.
Tips for Decoration
- Think About the Occasion: Consider where you plan to wear the hat. Choose decorations that align with the event’s vibe.
- Balance Is Key: When adding multiple decorations, ensure they complement rather than overwhelm each other.
- Test Before Committing: If unsure about a design, lay everything out without glue to visualize the final look.
- Keep It Lightweight: Too many heavy decorations can distort the hat’s shape. Opt for lightweight materials wherever possible.
Conclusion
Decorating a cowboy hat is a fantastic way to express creativity and individuality. With so many DIY ideas, you can transform a plain cowboy hat into a personalized masterpiece. Whether you embellish it with beads, flowers, or painted designs, each hat can tell a story that reflects your unique style.
So gather your materials, unleash your creativity, and let your cowboy hat shine!
FAQs
1. Can I use real flowers to decorate my cowboy hat?
- Actual flowers may wilt rapidly, yet they can still look lovely. If you prefer a natural look, consider using high-quality faux flowers that resemble the real thing.
2. How can I clean my decorated cowboy hat?
- Dust with a lint roller or a soft brush. Spot clean with a moist cloth and mild soap for more difficult spots. Do not let the hat become wet.
3. Will paint damage my hat?
- Using fabric or acrylic paint designed for textiles should not damage your hat, but always test a small area first.
4. How long will my decorations last?
- With proper care, decorations can last a long time. Keep your hat stored in a cool, dry place and avoid excessive exposure to moisture.
5. Can I add decorations to a straw hat?
Absolutely! Many decoration ideas work great on straw hats, but be mindful of the materials used to ensure they adhere well.


I’m really impressed along with your writing talents as neatly as with the format on your blog. Is this a paid theme or did you customize it yourself? Either way keep up the excellent quality writing, it is uncommon to peer a nice blog like this one today!